Tuesday, March 31, 2020

Artist Study: James Brunt

Hello All!

Today I have found a special land artist named James Brunt to design our project around. James' artwork uses only geometric patterns from natural materials wherever he is. You will notice that he incorporates many mandala radial designs in his artworks. We study mandalas in multiple ways in all of our 2-D 6-12 art classes. This project is great for every FPLS student or community member.


I will post many of James' beautiful artworks below for inspiration. If you would like to more of James' art and learn more about his process please check out this link: https://mymodernmet.com/james-brunt-ephemeral-art-mandalas/#.Wn3ZZ57YZmo.pinterest

Materials:
You may use any natural source that you find from nature around you. Try to choose elements with different or similar colors, textures, and shapes to help you create interesting patterns.

Directions:

Step 1:
Collect your materials.

Step 2:
Have fun and create a radial (circle pattern) using the materials that you have collected. Use a pattern to create interest or use a tree or large rock as an anchor for your artwork.


Enjoy this meditative process. Understand also that your first natural mandala or artwork may not be completely comparable to our example pictures BUT embrace the creativity and you are always able to start again.

As always, have fun and be creative!


Bottle Cap Mural

Hello Everyone!

Today we are again going to be using some of our leftover trash to create an artwork from. Loads of awesome art supplies come from things that we were going to throw away, we can recycle AND create art! We are going to be creating a bottle cap and lids mural! This project would be great for the whole FPLS community.


Materials-
Caps & lids (they can be plastic/metal or tin)
Hot glue
A canvas (anything that you make your artwork on)


Directions:

Step 1: Collect all of your materials

Step 2: Layout your composition onto your canvas. Place all the caps where you think they look cool. It can be abstract (non-representational) or it can look like something specific (representational) like a tree.

Step 3: After completing your composition one by one flip over each cap/lid hot glue it to your canvas.


As always, have fun and be creative!

Sunday, March 29, 2020

Rock Portrait or Landscape

Hello Everyone!

Today we are going to create a portrait or a landscape artwork by using what we find in nature! This is a great project for any FPLS student or family member.


Materials:
Rocks (lots of shapes and sizes)
A fine point sharpie
Hot Glue
A 'canvas' (A canvas really is anything that you choose to make your artwork on-nothing fancy)

Step 1:
Find your inspiration stones from your yard, drive-way or woods.

Step 2:
Bring in all of your stones and start placing them together. You will notice that some of the stones will seem to fit together to create a little picture on their own. Or you may choose stones that help represent a concept that you had in your mind. Both ways are productive, both ways are creative!

Step 3:
Once you have found your placement, simply hot glue the stones in place to your canvas.

Step 4:
Using your fine point sharpie add lines of interest (such as the balloon, legs and arms lines above. It may be a good use of your time to sketch out what you would like to do prior to adding them to your artwork.

Words to note:

Landscape- A picture of the land. The artwork may depict a tree, a carnival anything that incorporates the landscape. 
Portrait- A picture of a person or people. (Just like the example above!)

As always, have fun and be creative!

Saturday, March 28, 2020

Sock Bunny

Hello All!

We are going to make little bunnies for SPRING! It is finally getting warmer (thankfully) and if you celebrate Easter this may be a fun activity for you and the family.


Materials:
One old sock per bunny
String or ribbon (or shred up an old t-shirt)
Rice or beans
Empty soda bottle
Twine
Scissors
Black permanent marker

Step 1:
Cut the bottom half of your soda bottle off and take off the lid then place it lid side down into the sock (1-1.5 inches).

Step 2:
Pour your rice or beans down into the bottle filling the sock 2/3 of the way up the 'foot' of the sock. Use your hands to push the rice/beans tight and twist the sock above the rice/beans. Then use the twine to tie a tight double knot at the top of the rice.

Step 3:
Using the bottle again (as a funnel) add more rice to sock this time filling up the heel of the sock and then twist the sock and tie off with a double knot of twine.

Step 4:
Place the two sides of the sock tube together and with your scissors cut a bunny shape that is approximately 1.5 inches (cut both sides of the tube sock together so the ears are equal). Separate the ears and place them down or kinked or however, you want your bunny ears to look.

Step 5:
Take your ribbon, string or t-shirt strip and tie a little bow between the first and second segments (separating the body and head of the bunny).

Step 6:
The last step is using the black marker to create two little dot eyes and a little "x" for the bunny nose.

As always, have fun and be creative!


Friday, March 27, 2020

Rainy Day Puppet Show

Hello Everyone!

I hope that you are all safe, healthy and snuggled in on this beautiful (rainy) Spring day! We have the perfect rainy day activity for all of you today. This activity is perfect for our Elementary FPLS students.


Materials:

White paper
Construction or card stock paper
Straws/tongue depressors/skewers
Tape
Cardboard
Pencil
Scissors
Flashlight/small lamp
Dark Marker/Paint

Step 1:
Find your favorite storybook or characters via a Google search or whatever you wish to make as characters in your puppet show.

Step 2:
Draw or trace the outline of your characters onto either darker paper or paper that you have colored a darker color (you will see your puppets better this way!). You are making a simple contour line silhouette. This means that you are only drawing the outline of what you see (think a shadow!).  Draw and cut out all of your characters.

Step 3: Attached your characters to the straws/tongue depressors/skewers by taping them to the back of your characters.

Step 4: Using your carboard, cut out one big square from the middle of the board. This square will become your stage.

Step 5: Take white paper and tape it to the inside of your square to create a partition.

Step 6: Turn on the flashlight and or small lamp behind your cardboard display (aim the light at the white paper you taped).

Step 7: Start the show!! :)


As always, have fun and be creative!


Thursday, March 26, 2020

Paper Crane Mobile/Wall Hanging

Hello Everyone!

As many of you know we are preparing for our second baby and when I came across this I knew that it was something I wanted to feature! We are making a paper crane mobile or wall hanging today. This is a project that is more for our MS-HS FLPS students, but I will add an Elementary modification at the bottom too. 


Materials:
Paper
Scissors
Floss or fishing line
A cool looking stick
Needle or something small that can create a hole
Twine or rope

Instructions:


Or if you are like me and you need to work along with someone who is making a crane check out this link: https://www.youtube.com/watch?v=KfnyopxdJXQ

After you have made however many cranes as you desire. Create differing lengths of floss or fishing line down from your stick. We will then use the needle to create a little hole through the middle of the crane's body (and up through the little middle peak) tie a knot to the end of one of your strings and loop it through the crane knot down. Continue to do this until you have threaded each crane. After each crane is threaded take the top of the floss/fishing line and loop it around the top of the branch and double knot it to itself below the stick. Keep your lines spaced however you believe that it looks cool. For aesthetics take a piece of twine or rope and tie a knot on each end of the stick leaving a half-moon shaped slack in the middle (for hanging).

Place your mobile or wall hanging whatever you like! Obviously, for us we were thinking about a crib, but this would look just as cool hanging from a window in your bedroom. 

Elementary Modification: 

Paper cranes may be a little difficult for our elementary FPLS students so we have found a paper plane version!


Here are some simple directions for making paper airplanes: https://www.youtube.com/watch?v=veyZNyurlwU

As always, have fun and be creative!


Wednesday, March 25, 2020

Cardboard Kingdoms

Hello All!

If your house is anything like ours you have a plethora of Amazon boxes building up. Here is a craft for our FPLS Pre-K/Elementary kiddos.

I have added a handful of reasonable designs for inspiration. There are so many options with a cardboard box. All you need is cardboard, scissors, tape, and markers if you want to make your cardboard kingdom fancy!


Paint and add little special details that make your cardboard kingdom extra special.

As always, have fun and be creative!


Tuesday, March 24, 2020

Homemade Sidewalk Chalk Paint

Hello All!

Welcome to another day of creative fun at Creativity Corner. This project could span to a lot of our FPLS students. We are making homemade Sidewalk Chalk Paint! I chose to work on a paint v.s. chalk project because I assumed most of us do not have plaster of paris laying around our house-I definitely do not! :)


Materials:
-containers for the paint (I would suggest old cottage cheese jars with lids, empty ketchup bottles or     even a muffin tin
-water
-corn starch
-food coloring
-brushes (Check out our Make Your Own Brushes post   to https://creativitycorner20.blogspot.com/2020/03/make-your-own-paint-brushes.html)

Step 1:
Clean out and prepare your paint containers.

Step 2:
Mix 1/2 cup of corn starch and 2/3 cup of water together.

Step 3:
Add food coloring until you are pleased with your color.

Step 4:
Repeat the process as many times as you like to create more color options. Keep in mind food coloring can mix just like paint! Yellow + Blue = Green.

Step 5:
Paint away the quarantine blues! :)


As always, have fun and be creative!


Toilet Paper Roll Flowers

Hello Everyone,

I'm sure you have all noticed that there seems to be a toilet paper shortage these days. So, I've found a use for all of those used toilet paper rolls. We will recycle them into flowers!


Material:
Empty Toilet Paper Rolls
Scissors
Glue

Step 1: Using the scissors cut strips of the toilet paper tubes that are approximately 1/2 inch wide. Continue to do with will all of your excess empty rolls.

Step 2: Using both hands hold each end of the toilet paper roll so you can see through the hole. Then gently using your index finger and thumb squish the ends down into an almond shape. Continue to do this will all of your rolls.

Step 3: Using five squished rolls pieces form them together into a cluster or a flower and use a glue dot on the inside of where each roll touches another to connect them. Allow time to dry.


With this concept down you can make 10 little individual flowers or a large wall piece!

As always, have fun and be creative! :)

Monday, March 23, 2020

Pendulum Painting

Hello All!

Today we are going to be a bit adventurous with our creativity. This creative project would be fun for all of our FPLS students and families.

We are going to create pendulum paintings!


Materials Needed:

3 dowels OR a Tripod (or something similar that could work from your home)
Scissors
Plastic water bottle
Elmer's glue bottle cap
Hot-glue gun OR Gorilla Glue (or something similar)
Electrical OR duct tape
Hole punch (or you may use the scissors if necessary)
Large paper clip
Paint
Water
Large paper or 'canvas' that you want to paint


Directions:

Step 1: Use or create a tripod by tieing together your three dowels at the top.

Step 2: Using the scissors cut off the bottom 1/2 inch of a plastic water bottle. Using hot glue (or Gorilla Glue or whatever you have available) attach the Elmer's glue bottle cap to the plastic bottle spout. It may also be a good idea to use a bit of duct tape/electrical tape to reinforce this connection.

Step 3: You will need to cut or hole-punch the holes about 1/4 of an inch down the cut end of the bottle. It would be a good idea to reinforce these holes with a piece of tape of the inside and outside of the bottle prior to cutting the holes. Loop a long line of twine through each hole and knot of the inside (bottle side) then add another small piece of tape over the twine to help support its placement.

Step 4: Attached a doubled or tripled long loop of twine around the top of the tripod and it will hang down 1-3 inches below the tripod center.

Step 5: Take the three strings that are attached to the bottle and securely tie them to the tripod loop twine. Use double knots! The goal is that the nozzle hangs about 1 inch above the paper.

Step 6: Mix one part paint to one part water so the paint will run easily-be careful you still want the paint to have a paint-like quality (not too runny). Mix this mixture so it will flow easily then add it to the bottle. MAKE SURE THE CAP IS CLOSED on the glue bottle lid!

Step 7: Layout your paper or canvas under your canvas directly under the tripod center. Pull the bottle pendulum off to the side open the cap and gentle drop the pendulum bottle allowing the paint to run freely. Once you are happy with your artwork simply use your finger to cap the pendulum bottle pull it to the side and re-tighten the cap.

Step 8: Allow your project time to dry! You can re-use your pendulum as much as you would like. Use different colors and try swinging your pendulum bottle at different speeds or directions to create different lines and designs.


This creative project was definitely one of our more difficult processes-but hopefully you all enjoyed the process and the outcome. Even if there were little fails along the way hopefully you all still had fun-perspective is everything! Not to mention ending up with a cool looking final project.

As always, have fun and be creative!


Sunday, March 22, 2020

Blue Jean Race Track

Hello All!

Today we are going to repurpose an old pair of jeans into a race track. This race track would be a great activity for our Pre-K & Elementary FPLS students.


Step one is to find an old pair of jeans. Cut them apart down the outer and inner seam. Once they are cut apart into two pieces trance out one long rectangle (about 5-6 inches in length and 3 inches in width). Then make an S curve and a C curve that turns left and finally a C curve that turns right (3 inches wide). Use these 4 pieces to trace as many pieces as possible! Use the butt pockets to create a 4 point intersection.

After you have complete all of your pieces take yellow or white paint or even simpler a yellow or white paint marker and make the yellow 'mid-road' lines.


Now it is time to play!

As always, have fun and be creative!


Saturday, March 21, 2020

Make Your Own Paint Brushes

Hello Everyone!

Today we are going to make our own paintbrushes. This is an activity that could be interesting for all ages and as always made with simple materials from around the house and outside.


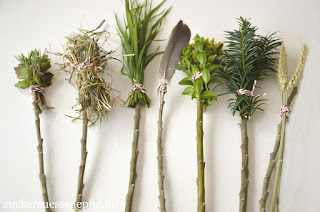
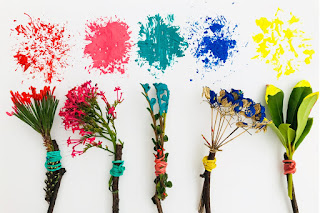
Step one is to go out on the hunt for interesting textures: different leaves, grasses, a pinecone, you are welcome to become inspired with things that you can find around the house too (think twine or old dryer sheets). There are no wrong answers when it comes to being creative; don't be afraid and take chances!

Once you have found your materials then you will attach them to their sticks or dowel rods whatever you have available. To attach you can use rubber bands, hair elastics or even string. Make sure when you attach your brushes to the sticks that you tie them securely and you leave extra room with just the "brush end" that passes the stick.

Now the fun part-PAINT!


Notice the different textures that your brushes create. Take that knowledge and make a complete painting.

As always, have fun and be creative!


Homemade Play Dough

Hello All!

As many of you know I have a two-year-old at home and sheltering in place can get a little boring. So for today's creative project, I found a recipe to make homemade play-dough. I understand that many of our older FPLS students may not be interested in this-BUT it may be a nice stress reliever for you too.


The Recipe:

1 cup of water
1 tablespoon of vegetable oil
1/2 cup of salt
1 tablespoon of cream of tartar
Food coloring of your (think about our Color Theory Lessons and mixing paint-see below!)


Mixing food coloring is very similar to mixing paint!


Mixing Instructions:

1. Combine water, oil, salt, cream of tartar, and food coloring in a saucepan and heat until warm.
2. Remove from heat and add flour.
3. Stir, then knead until smooth. The cream of tartar makes this dough last up to six months or sometimes longer! If you do not have the cream of tartar the recipe should still work but it will not last as long.
4. Store your dough in a ziplock bag.


As always, have fun and be creative!

Thursday, March 19, 2020

Nature Weaving

As we are all working and learning from home, for the time being, I decided to make our first project a Nature Weaving!


Nature Weavings can be made from only natural resources or you can use a loom that you may already have. The goal behind this fun activity is to go outside and search for your materials and then start the simple meditative process of weaving.

Weaving is a historical process of the art and craft world too, so if you are inclined to learn about the history of weaving you can follow this link about a short history of weaving: https://www.youtube.com/watch?v=bq58FAhuhxM.

Okay so let's start! Once you have collected your materials (typical materials may include: long grasses, leaves, feathers, sticks and whatever else you can find) from outside you will either string up your loom or you can use four sticks. For the stringing process or the loading of your loom. You will need to attach all four sticks together at the corners to create a square (or use a traditional loom) then you will use string, twine or shoe strings to create a vertical wrap that repeats as wide as your loom/stick loom. See here:


Once you have loaded your loom you can add the natural materials that you have found! Start on the left side of the loom (like we read here is America-left to right) and go on top of the first string then under the second and repeat the pattern until you make it to the end of the loom. Then restart the process for the second row expect you will start under the first string and on top of the second string and continue the pattern. For the third row, you start back with the first-row pattern (top, under, top, under) for the fourth row, use the second pattern (under, top, under, top).


Think about what art elements you can use to elevate your artwork. Think about patterns, color, and even textures!

As always, have fun and be creative!


Wednesday, March 18, 2020

Welcome to Creativity Corner!

Hello All!

Welcome to Creativity Corner. This Blog is a resource for the students of Fayetteville Perry Local Schools as well as other creatives around the globe. This March has been a very difficult and scary time for a lot of us as we learn to evolve and thrive amidst the Covid19 crisis.

This blog will primarily focus on fun, simple and create tasks that you can work on during our 'extended break' with materials that you can find around your house!

So, join in and create along with us!